I started a new thread so this can all be in one place. This original thread is where much of this information came from: http://www.kawasakininja300.com/for...00.com/forum/12-ninja-300-appearance-modifications/885-gsx-r-shock-install.html
Parts needed:
Preparation:
To prepare the GSX-R shock for install you need to do a few things.
1. Remove all unnecessary parts. It should look like the linked picture.
3. Drill out the bottom Clevis holes and the top bushing using the 15/32" drill bit. Make sure you're using the right kind of drill bit for Aluminum\Metal. The old thread made this sound really quick and easy, but it took me at least a minute per hole.
Remove\Install Steps:
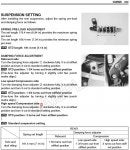
I've attached the relevant pages from the service manual (attachments 2 and 3), refer to that for pictures.
1. Lift Rear of bike using Rear Stand.
2. Squeeze the front brake slowly until it won't go any further and then zip-tie or bind the lever down. Once you lower the bike from the rear stand this keeps it from falling over. Don't skip this step.
4. Remove the lower fairings.
5. Loosen the two shock nuts using a 19mm socket. They are on tight, a breaker bar might be needed.
6. Loosen the two dog bone nuts here as well. You shouldn't need to get a wrench or socket on the bolt to loosen the nut.
7. You need to have the rear of the bike lifted without using the rear stand.
12. To install the new shock you first have to insert it into position.
16. Now that everything is in place you can torque everything down
18. Lift back onto rear stand, remove jack stands or other lift method.
19. Remove zip-tie on front brake.
20. Lower bike back to ground.
21. Test compression by pushing on seat and sitting on seat. Make sure it feels fine before taking test ride.
* This information is provided with no warranty of any kind. Every effort has been made to make this information as accurate and safe as possible. Anyone attempting this modification is doing so at their own risk.
Parts needed:
- 1 GSX-R 600/750 (2006-2007) Shock. Ebay probably easiest source($20-50).
- 2 M12 120mm x 1.25 pitch Bolts. 8.8 grade or better suggested. I used part# 91180A723 from McMaster-Carr
- 4 1/2" spacers. I used 1/2" aluminum spacers, part# 92510A364 from McMaster-Carr. You can also use 1/2" wide 9/16" nuts. They will fit over the M12 bolt.
- Torque Wrench
- Rear Stand
- Jack Stands
- Stackable or adjustable Wood blocks\wedge or something to lift the rear tire as needed(I used an old shoe)
- You'll need to be able to adjust the position of the rear tire a bit to get it so everything is easy to remove and slide back in place.
- 1 Zip tie or some strong rubber bands.
- 19mm socket
- 14mm socket
- 15/32" drill bit and drill.
- Calipers for measuring shock clevis.
- Protective gloves. Thin rubber ones give the best dexterity.
Preparation:
To prepare the GSX-R shock for install you need to do a few things.
1. Remove all unnecessary parts. It should look like the linked picture.
- It may have a Clevis on top with a huge nut. Remove both.
- It may have some linkage on the bottom, Remove.
3. Drill out the bottom Clevis holes and the top bushing using the 15/32" drill bit. Make sure you're using the right kind of drill bit for Aluminum\Metal. The old thread made this sound really quick and easy, but it took me at least a minute per hole.
- If you have a bench vice, probably best to clamp the shock in there.
- You can hold it down against a table. Just hold it tight so it doesn't move while drilling.
- Do the top first. Try to be as centered as possible.
- Do the bottom one side at a time.
- Do each from the outside. Don't try to push the bit all the way through in one go.
- Once each has been done separately, then run the drill bit all the way through.
- Test fit the 120mm bolts you bought through the holes. The bolt should go smoothly through both bottom holes with no binding.
- NOTE: These bolts are not used for these holes, but they are the same thickness as the ones that do go there.
- It's hard to do this step right before removing the stock shock since you'll want to measure against the stock shock and test fit the new shock on the linkage once you get close. The stock shock is 3.28mm wide. The GSX-R shock is about 3.1mm wide.
- You'll probably want to use some calipers to measure and compare.
- I used a hand file to widen. I do not suggest this method. It's hard to do it right or really get a nice flat grind, but it does work. It also takes about an hour. If you want to use this route I suggest rough and fine files. Use the rough file to get almost there. Then the smooth file to get it all the way there.
- Using a bench grinder is probably the best method. You need to remove about 1mm from each side.
- A dremel is probably a bad idea here. Too hard to grind the large flat area you need to.
The manual appears to have a typo. I'm pretty sure my Red fix is correct.
6. You probably cannot reset the spring preload until it is installed on the bike. You may need a spanner wrench for this, but the stock ninja 300 spanner wrench might work. Or a hammer and a blunt punch.
Remove\Install Steps:
I've attached the relevant pages from the service manual (attachments 2 and 3), refer to that for pictures.
1. Lift Rear of bike using Rear Stand.
2. Squeeze the front brake slowly until it won't go any further and then zip-tie or bind the lever down. Once you lower the bike from the rear stand this keeps it from falling over. Don't skip this step.
Bonus: If you leave this on for 6-8 hours it helps firm up the front brake and gets any stubborn air of the lines.
3. Remove the rear hugger. 2 screws and 2 hex bolts.
4. Remove the lower fairings.
5. Loosen the two shock nuts using a 19mm socket. They are on tight, a breaker bar might be needed.
- Top bolt is under the small flat round covers on frame.
- Bottom bolt is on the triangular shaped linkage below the swingarm.
6. Loosen the two dog bone nuts here as well. You shouldn't need to get a wrench or socket on the bolt to loosen the nut.
7. You need to have the rear of the bike lifted without using the rear stand.
- For those with non-stock rear sets you can use jack stands on the rear pegs.
- For those with stock rear sets, you'll need to use something else. Kawasaki has a special jack attachment thing. Please let me know the best method here and I'll update this post.
- You also need to keep the rear tire off the ground to ease removal and install. Put wood blocks(wedge) under rear tire so it won't drop when shock is removed.
Set the rear stand aside, but keep it nearby you may need it again soon.
9. Remove the dog bone nuts and bolts and remove the dog bones.
- You will NOT be reusing the bolt, but you WILL reuse the nut if you got the right replacement bolts.(1.25 pitch)
- Be careful about rubber rings and bushings down here. Keep them together and pushed into the linkage or install point.
- With the correct rear tire height, these bolts should slide right out.
- Do the bottom first. Then the top. The shock will drop to the ground, so have a hand on it when you remove the top bolt.
- If you have trouble pulling the bolts out, adjust the amount the rear tire is lifted until it's easy to pull the bolts out.
- You can lift the rear swingarm using the rear stand, adjust the blocks(shoe) until the height is right.
- Once you get it right, they slide right out.
- You will be reusing these Nuts and Bolts. Do not lose them.
- You may find some little rubber rings from the top bushing. The ones at the top cannot be reused as the bushing sizes are different. They are too big for the GSX-R bushing. Maybe you can cut part of the ring and make them fit? I didn't use them.
- If any bushings are rings come out at the bottom, reinstall them down there. This shouldn't happen if things are smooth to remove.
12. To install the new shock you first have to insert it into position.
- I could not insert the new shock from the top. It just doesn't want to fit.
- I installed it from the bottom.
- To do this you need to lower the rear tire onto the ground to get maximum clearance from the swimgarm.
- You can use rear stand to life the swingarm, remove blocks(shoe) and lower the tire again.
- Work the remote chamber through the swingarm hole carefully and then you should be able to raise it into position. It takes a little fiddling. If you want to keep the new shock pretty, maybe put some masking tape on the top until it's all done then remove the tape.
- You might be tempted to do the top bolt, don't do that.
- Install the bottom of the shock into the linkage using the saved nut and bolt. Finger tight.
- Let the shock rest on the swingarm with top bolt uninstalled.
- You only want to install the top dogbone bolt for now. Let the dogbones hang lose. We'll do the lower one in step 15.
- Use the new 120mm bolts and the spacers you bought.
- It should be bolt head, dog bone, spacer, linkage, spacer, dog bone, nut.
- If the bolts seem too short, it's probably because you bumped out the bushings, push everything back into place and they'll fit fine.
- Again just finger tight for now.
- You'll need to lift the rear wheel again. Probably a bit higher than you lifted it ever before. If the height is right, the bolt should slide right through.
- Finger tight for now.
16. Now that everything is in place you can torque everything down
- Torque all 4 bolts down to 44 lb\ft. (59 Nm)
- These are lock nuts, you shouldn't need to use locktite, but you may want to put a little anti-sieze on the bolts.
- The shock bolts should lock in fine without needing to keep a wrench or another socket on the bolt head.
- The two new bolts will likely need a wrench on the bolt head to let you get them able to be torqued down. Once you get them tight enough you should be able to skip the wrench on the bolt head, just like the shock.
18. Lift back onto rear stand, remove jack stands or other lift method.
19. Remove zip-tie on front brake.
20. Lower bike back to ground.
21. Test compression by pushing on seat and sitting on seat. Make sure it feels fine before taking test ride.
* This information is provided with no warranty of any kind. Every effort has been made to make this information as accurate and safe as possible. Anyone attempting this modification is doing so at their own risk.